Basic Timezone API

timezone-api is lightweight Flask app with TimezoneFinder(L) python library and provides a simple interface. Your request the timezone information for specific latitude and longtitude pair.

Request Parameters

Parameters are separated using the ampersand(&) character.

  • lat: latitude (eg. lat=39.6034810) (Required)
  • lng: longtitude (eg. lng=-119.6822510) (Required)
  • timestamp: timestamp (eg. timestamp=1331161200) (Required)

Example Request

Request:

API urls must follow this format:

https://api.example.com/timezone/api?lng=-119.6822510&lat=39.6034810&timestamp=1331766000

Response:

{"dstoffset":3600.0,"rawoffset":-28800.0,"status":200,"tzname":"America/Los_Angeles"}

- tzname: Timezone name
- dstoffset: the offset for daylight-savings time in seconds.
This will be zero if the time zone is not in Daylight Savings Time during the specified timestamp.
- rawoffset: the offset from UTC (in seconds) for the given location.
This does not take into effect daylight savings.
- status: response code
    - 200: the request was successful
    - 400: missing parameter(s)
    - 422: out of bounds error

API Health

To check the API status or health

Request:

https://api.example.com/timezone/health/

Response: OK

API Info

For information about API

Request:

https://api.example.com/timezone/info/

Response:

{"debug":false,"running-since":1620688782.0930135,"version":"0.0.1"}

- debug: APP debug status
- running-since: API start time
- version: API version

Installation

I. Method: From Docker Hub

$ docker run -d -p 8080:8000 --name timezone-35 mofm/timezone-api
  • Test
$ curl --request GET  "http://127.0.0.1:8080/timezone/api/?lng=-119.6822510&lat=39.6034810&timestamp=1331766000"
{
  "dstoffset": 3600.0,
  "rawoffset": -28800.0,
  "status": 200,
  "tzname": "America/Los_Angeles"
}
II. Method: Build Docker image

  • Clone this repostory
$ git clone https://github.com/mofm/timezone-api.git
  • Build Docker image (slim image with Google Distroless)
docker build -t timezone-img .
  • Running Docker image
$ docker run -d -p 8080:8000 --name timezone-api ti
  • Test
$ curl --request GET  "http://127.0.0.1:8080/timezone/api/?lng=-119.6822510&lat=39.6034810&timestamp=1331766000"
{
  "dstoffset": 3600.0,
  "rawoffset": -28800.0,
  "status": 200,
  "tzname": "America/Los_Angeles"
}
Unbound DoH behind Nginx

Unbound DoH is waiting HTTP/2 requests. But Nginx proxy module doesn't support HTTP/2 on the upstream connections. So you can use grpc proxy:

location /dns-query {
     grpc_pass grpc://unbound-host;
}

and disable TLS for DNS-over-HTTP downstream service in unbound.conf:

http-notls-downstream: yes

URLs of Blacklists

Free, up-to-date and large blacklist databases for those who want to set up DNS firewall:

Name

URL

Energized Protection

https://block.energized.pro/

OISD

https://oisd.nl/

Abuse.ch

https://threatfox.abuse.ch/

Adaway

https://adaway.org/

Adguard List

https://justdomains.github.io/blocklists/#the-lists

Blocklist.site

https://github.com/blocklistproject/Lists

EasyList

https://justdomains.github.io/blocklists/#the-lists

Easyprivacy

https://justdomains.github.io/blocklists/#the-lists

NoCoin List

https://justdomains.github.io/blocklists/#the-lists

PornTop1M List

https://github.com/chadmayfield/my-pihole-blocklists

Simple Ad List

https://s3.amazonaws.com/lists.disconnect.me/simple_ad.txt

Simple Tracker List

https://s3.amazonaws.com/lists.disconnect.me/simple_tracking.txt

StevenBlack/hosts

https://raw.githubusercontent.com/StevenBlack/hosts/master/hosts

WindowsSpyBlocker

https://github.com/crazy-max/WindowsSpyBlocker

YoYo List

https://pgl.yoyo.org/adservers/

Block ads and malware via BIND9 RPZ

Installation on Ubuntu 20.04 LTS

  • Run following command to install BIND 9 on Ubuntu 20.04
$ sudo apt update
$ sudo apt install bind9 bind9utils bind9-dnsutils

Configurations for recursive DNS resolver with RPZ(response policy zone)

  • To enable recursion service, edit /etc/bind/named.conf.options :
    // hide version number from clients for security reasons.
    version "not currently available";

    // optional - BIND default behavior is recursion
    recursion yes;

    // provide recursion service to trusted clients only
    allow-recursion { 127.0.0.1; 192.168.0.0/24; 10.10.10.0/24; };

    // disallow zone transfer
    allow-transfer { none; };

    // enable the query log
    querylog yes;

    //enable response policy zone.
    response-policy {
        zone "blocked.local";
    };
  • Add RPZ zone in /etc/bind/named.conf.local :
    zone "blocked.local" {
        type master;
        file "/etc/bind/db.blocked.local";
        allow-query { localhost; };
        allow-transfer { localhost; };
    };
  • add following lines in /etc/bind/named.conf to use separate log file for RPZ(recommended):
    logging {
        channel blockedlog {
            file "/var/log/named/blocked-zone.log" versions unlimited size 100m;
            print-time yes;
            print-category yes;
            print-severity yes;
            severity info;
        };
        category rpz { blockedlog; };
    };
  • If /var/log/named/ directory doesn't exist, create it and make bind as the owner:
$ sudo mkdir /var/log/named/
$ sudo chown bind:bind /var/log/named/ -R

Creating Zone File

  • first, clone this repository:
$ git clone https://github.com/mofm/blocked-zone.git
  • If there is domain(s) you want to block, you can add it to the blacklist file.

  • execute the blocked-zone.sh script(this script downloads StevenBlack host file and then creates RPZ zone file):

$ sudo bash blocked-zone.sh

Check configurations and service:

$ sudo named-checkconf
$ sudo named-checkzone rpz /etc/bind/db.blocked.local

If no problem, restart and enable bind9 service;

$ sudo systemctl restart bind9
$ sudo systemctl enable bind9

Test:

  • You can run the dig command on the BIND server to see if RPZ is working:
$ dig A adskeeper.com @127.0.0.1
  • You can also check '/var/log/named/blocked-zone.log' for query log:
$ sudo tail /var/log/named/blocked-zone.log
  • READY, you can add this BIND9 host IP address to your host(s).

Optional

Ingress path redirection appends port

Ingress bazi URL isteklerine container port'u ile redirect etmeye calistigi gibi bir sorunla karsilasabilirsiniz. Ornek olarak biraz daha acmak gerekirse;

$ curl -I http://cafe.example.com/coffee/

HTTP/1.1 200 OK
Date: Mon, 07 Dec 2020 23:47:21 GMT
Content-Type: text/html
Content-Length: 87466
Connection: keep-alive
Last-Modified: Mon, 07 Dec 2020 20:48:36 GMT
ETag: "5fce9524-155aa"
Accept-Ranges: bytes

Yukarida goruldugu "http://cafe.example.com/coffee/" adresine gonderdigimiz istek saglikli sekilde "200" kodunu cevap olarak donuyor. Birde "http://cafe.example.com/coffee" seklinde istekte bulunarak test edelim:

$ curl -I http://cafe.example.com/coffee

HTTP/1.1 301 Moved Permanently
Date: Sun, 07 Dec 2020 23:52:48 GMT
Content-Type: text/html
Content-Length: 169
Connection: keep-alive
Location: http://cafe.example.com:8080/coffee

Bu ornek ise goruldugu gibi "http://hostname:cointainer_port/paths" seklinde container portunu da ekleyerek sayfayi yanlis sekilde redirect etmeye calisiyor ve sayfa ulasilamaz oluyor. Buradaki '8080' portu ingress'in arka tarafindaki nginx container'in yayin yapmakta olan portu.

Sorunun sebebine gelince, bu sorunun ingress ile hic bir alakasi yok. Hem kubernetes/ingress-nginx hem de nginxinc/nginx-ingress ingress controller'larinda nginx konfigurasyonu uzerindeki port_in_redirect degeri default olarak 'off' olarak. Fakat arka tarafta calisan nginx container uzerindeki bu konfigurasyonu 'on' yapilmissa bu durumla karsilasabilirsiniz. Bunu nginx.conf uzerinde 'port_in_redirect off;' seklinde kapatarak yasanmasini engelleyebilirsiniz.

Asagidaki sekilde nginx.conf'u configmap'e ekleyerek nginx pod'un bu configmap'i kullanmasini saglayarak deployment yapabilirsiniz.

apiVersion: v1
kind: ConfigMap
metadata:
  name: nginx-conf
data:
  nginx.conf: |
    worker_processes  1;

    error_log  /var/log/nginx/error.log warn;
    pid        /tmp/nginx.pid;


    events {
        worker_connections  1024;
    }


    http {
        proxy_temp_path /tmp/proxy_temp;
        client_body_temp_path /tmp/client_temp;
        fastcgi_temp_path /tmp/fastcgi_temp;
        uwsgi_temp_path /tmp/uwsgi_temp;
        scgi_temp_path /tmp/scgi_temp;

        include       /etc/nginx/mime.types;
        default_type  application/octet-stream;

        log_format  main  '$remote_addr - $remote_user [$time_local] "$request" '
                          '$status $body_bytes_sent "$http_referer" '
                          '"$http_user_agent" "$http_x_forwarded_for"';

        access_log  /var/log/nginx/access.log  main;

        sendfile        on;
        #tcp_nopush     on;

        port_in_redirect off;

        keepalive_timeout  65;

        #gzip  on;

        include /etc/nginx/conf.d/*.conf;
    }

---

apiVersion: apps/v1
kind: Deployment
metadata:
  name: coffee
spec:
  replicas: 3
  selector:
    matchLabels:
      app: coffee
  template:
    metadata:
      labels:
        app: coffee
    spec:
      containers:
      - name: www
        image: nginxinc/nginx-unprivileged
        ports:
        - containerPort: 8080
        volumeMounts:
        - name: nginx-conf
          mountPath: /etc/nginx/nginx.conf
          subPath: nginx.conf
          readOnly: true

---

---
apiVersion: v1
kind: Service
metadata:
  name: coffee-svc
spec:
  ports:
  - port: 80
    targetPort: 8080
    protocol: TCP
    name: http
  selector:
    app: coffee

Kubernetes, Static Website, Git

Uzun bir aradan sonra Kubernetes ile ilgili bir konu ile yazilara basliyoruz. Bu yazida Kubernetes nedir? Ne degildir? gibi Kubernetes 101'den bahsetmek yerine bir senaryo ile ilgili sizlere fikir vermek istedim. Hemen kisaca senaryodan bahsedelim:

Senaryo:

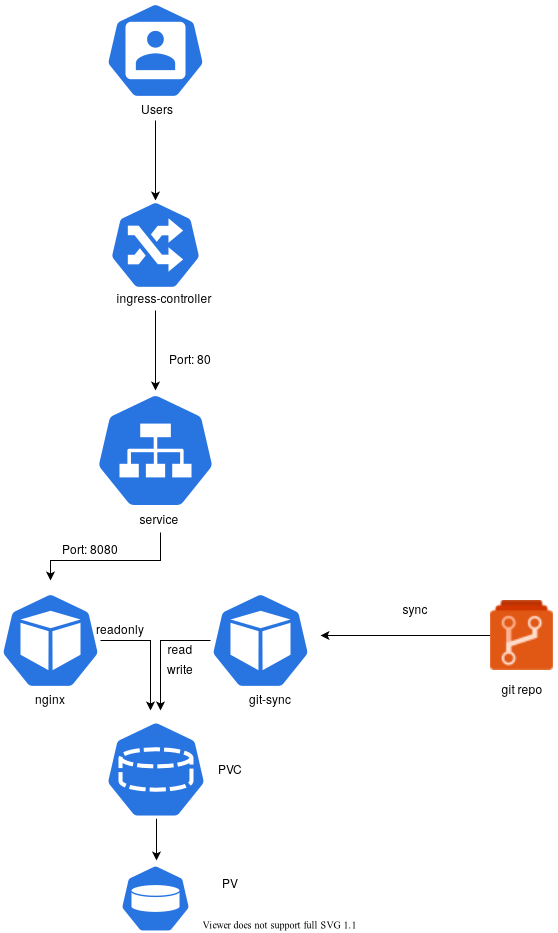
Gunumuzde insanlar blog yazilarini yayinlamak icin static websites generator'lardan(nikola, jekyll, hugo vb.) birini kullanmaya yoneliyor. Daha onceden siklikla Wordpress kullanilirken artik bu sekilde bir cozum kullanimin farkli sebepleri olabilir. Bunu simdilik irdelemeyecegim. Bu senaryomuzda yukarda bahsettigimiz sekilde olusturdugunuz static websitenizi "Kubernetes uzerine git ile nasil otomatik update edebiliriz?" cozumu hakkinda fikir verecegim. Senaryo semasinin ayrintilari asagidaki gibidir:

/images/k8s-web-git.png

Senaryoyu biraz daha ayrintilandirmak gerekirse, en alt katmandan en uste dogru cikalim. Bu senaryo icin volume olarak node uzerindeki Local diski kullandim. Bu production icin uygun olmasa da test ortamini olusturmak ve iki container'in ayni volume'u kullanabilmesi icin bunu sectim.

PersistentVolume ve PersistentVolumeClaim Olusturulmasi:

Burada bir noktaya deginmek gerekirse olusturacagimiz bu volume'u nginx container'i icin sadece readonly mount ederken git-sync icin ise hem read hem de write olacak sekilde mount edecegiz. git-sync belirledigimiz git reposunu buraya sync edecektir. Bu yuzden hem read hem write yetkisi gerekirken, nginx sadece sayfalari yayinlayacagi icin read yetkisi yeterlidir.

PersistentVolume:

apiVersion: v1
kind: PersistentVolume
metadata:
  name: my-local-pv-01
spec:
  capacity:
    storage: 1Gi
  accessModes:
  - ReadWriteOnce
  persistentVolumeReclaimPolicy: Delete
  storageClassName: my-local-storage
  local:
    path: /mnt/disk1/vol1
  nodeAffinity:
    required:
      nodeSelectorTerms:
      - matchExpressions:
        - key: kubernetes.io/hostname
          operator: In
          values:
          - node3

Yukardaki sekilde sadece node3 hostname'li node uzerindeki '/mnt/disk1/vol1/' uzerinde 1GB buyuklugunde persistentVolume olusturduk. Yukarida da belirttigim gibi kesinlikle production ortaminda local disk kullanmayin!

$ kubectl apply -f pv.yaml

persistentVolume olusturtuktan sonra persistentVolumeClaim olusturalim.( "pv ve pvc nedir?" merak ediyorsaniz buradan )

PersistentVolumeClaim:

kind: PersistentVolumeClaim
apiVersion: v1
metadata:
  name: my-claim-01
spec:
  accessModes:
  - ReadWriteOnce
  storageClassName: my-local-storage
  resources:
    requests:
      storage: 1Gi
$ kubectl apply -f pvc.yaml

Volume olusturdugumuza gore artik yayinlayacagimiz static websitesi icin deployment asamasina gecebiliriz.

Deployment:

Asagidaki sekilde deployment olusturalim:

apiVersion: apps/v1
kind: Deployment
metadata:
  name: blog
spec:
  replicas: 1
  selector:
    matchLabels:
      app: blog
  template:
    metadata:
      labels:
        app: blog
    spec:
      containers:
      - name: git-sync
        image: k8s.gcr.io/git-sync/git-sync:v3.2.0
        volumeMounts:
        - name: www-persistent-storage
          mountPath: /tmp/git
        env:
        - name: GIT_SYNC_REPO
          value: https://github.com/user_name/blog.example.com.git
        - name: GIT_SYNC_DEST
          value: "blog"
        - name: GIT_SYNC_WAIT
          value: "10"
      - name: www
        image: nginxinc/nginx-unprivileged
        ports:
        - containerPort: 8080
        volumeMounts:
        - name: www-persistent-storage
          mountPath: /usr/share/nginx/html
          readOnly: true
      volumes:
      - name: www-persistent-storage
        persistentVolumeClaim:
          claimName: my-claim-01
      nodeSelector:
        kubernetes.io/hostname: node3

---
apiVersion: v1
kind: Service
metadata:
  name: blog-svc
spec:
  ports:
  - port: 80
    targetPort: 8080
    protocol: TCP
    name: http
  selector:
    app: blog

git-sync environment degerlerinden GIT_SYNC_REPO yerine git reponuzu ve GIT_SYNC_DEST degerini isteginize gore degistirebilirsiniz.

$ kubectl apply -f deployment.yaml

Deployment olusturulup tamamlandiktan sonra websitemizi yayinlamak icin ingress olusturabiliriz.

apiVersion: networking.k8s.io/v1beta1
kind: Ingress
metadata:
  name: blog-ingress
spec:
        #  ingressClassName: nginx # use only with k8s version >= 1.18.0
  rules:
  - host: blog.example.com
    http:
      paths:
      - path: /blog
        backend:
          serviceName: blog-svc
          servicePort: 80
$ kubectl apply -f ingress.yaml

ingress tanimlamamiz da yapildigina gore http://blog.example.com/blog adresinden websitemize ulasabiliriz. Artik git uzerine sayfalarinizi push'ladiktan sonra sayfaniz otomatik guncellenecektir. Umarim size fikir vermistir.

OpenLDAP Schema for Postfix

If you configure postfix-dovecot with OpenLDAP, you will need specific LDAP's attributes. So I have written a schema.

postfix-new.schema:
  • 4 Attributes ( mailacceptinggeneralid, maildrop, mailEnabled, mailQuota )

  • 1 ObjectClass ( postfixUser )

Libvirt ve OpenvSwitch

Bu yazimda libvirt ile openvswitch entegrasyonu hakkinda giris seviyesinde adim atacagiz. Kurulum ve entegrasyona gecmeden once bu iki yazilim nedir, ne degildir onlari taniyalim.

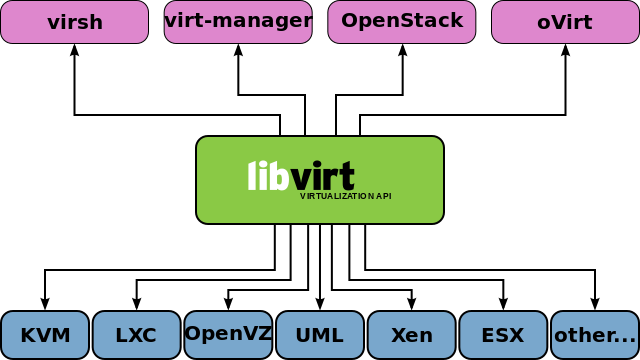
Libvirt [1] , Redhat tarafindan 2005'ten bu yana gelistirilmeye devam eden sanallastirma ortamlari icin daemon, API ve yonetim aracidir.

/images/libvirt_hypervisors.png

Libvirt bilinen bir cok hypervisor'u desteklemektedir. Iste bunlardan bazilari:

  • KVM

  • LXC

  • OpenVZ

  • Xen

  • User-mode Linux (UML)

  • Virtualbox

  • VMware ESX

  • VMware Workstation

  • Hyper-V

  • PowerVM

  • Parallels Workstation

  • Bhyve

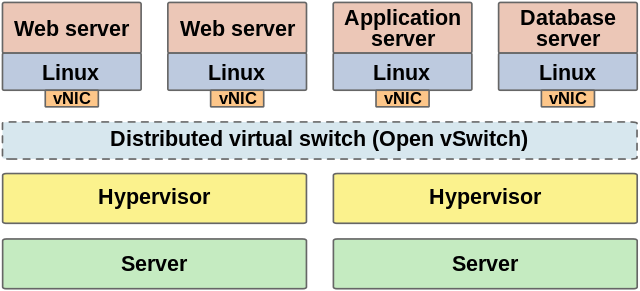
OpenvSwitch [2] , kisaca sanal multilayer network switchtir. OpenvSwitch, bir SDN switch olarak hypervisor uzerindeki sanal makineleri fiziksel olarak ayri bulunan network switchler ile entegre calisarak yonetebilir.

/images/Distributed_Open_vSwitch_instance.png

Birden fazla protokolu desteklemektedir:

  • NetFlow

  • sFlow

  • SPAN

  • RSPAN

  • CLI

  • LACP

  • 802.1ag

Kurulum:

Paket yoneticiniz ile libvirt ve openvswitch kurulumunu yapalim. Siz kendi dagitiminiza ve paket yoneticinize gore kurulumu yapabilirsiniz. Gentoo uzerinde, libvirt icin gerekli "USE FLAG"lari aktif edip kurulumunu yapalim.Binary dagitimlar icin buna gerek yoktur. Siz direk paket yoneticiniz ile kurulumu yapin.

/etc/portage/package.use/libvirt:

app-emulation/libvirt macvtap vepa qemu virt-network

Simdi kurulumu yapabiliriz.

# emerge -av libvirt

OpenvSwitch kurulumunu yapalim.

# emerge -av openvswitch

Sistem baslangici icin bu servisleri enable edelim.

# rc-update add ovsdb-server default
# rc-update add ovs-vswitchd default
# rc-update add libvirtd default
# rc-update add libvirt-guests default

Sistem acilisinda bu modullerin yuklenmesi icin

/etc/conf.d/modules:

modules_4="openvswitch kvm kvm_intel tun"

Servisleri baslatalim.

# /etc/init.d/ovsdb-server start
# /etc/init.d/ovs-vswitchd start
# /etc/init.d/libvirtd start
# /etc/init.d/libvirt-guests start

Ansible Gentoo-Portage Update

Ansible Portage module [1] ile Gentoo Linux sisteminizi guncelleyebilir ve upgrade edebilirsiniz. Asagidaki ornekte Ilk once buildfarm adini verdigimiz sunucu uzerinde compile edilip diger gentoo sunucularimiza binary paketleri elde edip guncellemelerini yapmaktadir.

Yukarda bahsettigim sekilde bir buildfarm sunucusu yani paketlerin compile edilecegi sunucuda binary paketleri uretip diger sunuculara bu binary paketleri sunmak icin portage uzerinde "buildpkg" ozelligini aktif etmek gerekmektedir.

/etc/portage/make.conf:

FEATURES="buildpkg"

Diger Gentoo sunucularin buildfarm uzerindeki paketleri alabilmesi icin yayinlamasi gerekli. Bunun birden fazla sekilde kendinize cozum saglayabilirsiniz. FTP, FTPS, NFS, SSH, HTTP, HTTPS gibi. Biz kucuk bir web sunucusu kurup paketleri bu sekilde yayinlayalim.

# emerge -av www-servers/lighttpd

lighttpd web sunucusunu kurduktan sonra olusturulan paketlerin buradan yayinlanmasini konfigure edelim."/etc/lighttpd/lighttpd.conf" dosyasinin sonuna asagidaki iki satiri ekleyin.

/etc/lighttpd/lighttpd.conf:

server.modules += ( "mod_alias" )
alias.url = ( "/packages" => "/usr/portage/packages/" )

Artik web sunucumuzu baslatabiliriz.

# rc-update add lighttpd default
# /etc/init.d/lighttpd start

Buildfarm sunucumuz ile ayarlarimiz bu kadar. Artik diger sunucularimizi buildfarm sunucusu uzerinden binary paketleri almasi icin konfigure edebiliriz.

/etc/portage/make.conf:

FEATURES="getbinpkg"
PORTAGE_BINHOST="http://buildfarm.hostname/packages"

Artik ansible ile sistemizi ilk once buildfarm ile derlenip binary paketler ile diger sunucularinizi guncelleyebilirsiniz.